
Growing up, I was always fascinated by the magic of cake. I was one of those kids who only anticipated cake at weddings (oh and the bride and her entourage’s outfits…but mostly cake). I could never fathom how cake was made. The first cake I learned to make, or rather watched being made, was a banana cake on a charcoal stove. I was amazed by the whole process. Fast forward to about a decade later and I am taking a course unit where we had to cook.
We had one session for baking and I remember my lecturer telling us the different kinds of cakes, how they are made and their distinct tastes. I heard about chiffon, fruit, sponge and marble cakes but one that caught my attention the most was the pound cake because it sounded like it was the easiest to make. A ratio of 1:1:1 does not sound too intimidating. No? Ever since then I set out to perfect my version of a pound cake. As much as the ratio is basically equal parts of flour, butter, sugar and eggs, there are different versions.
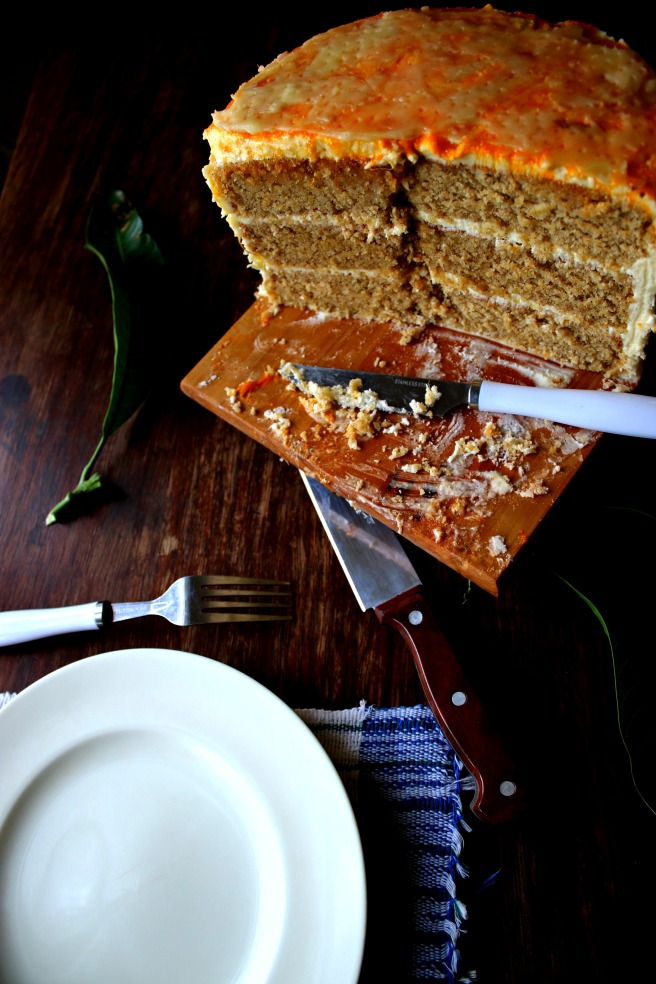
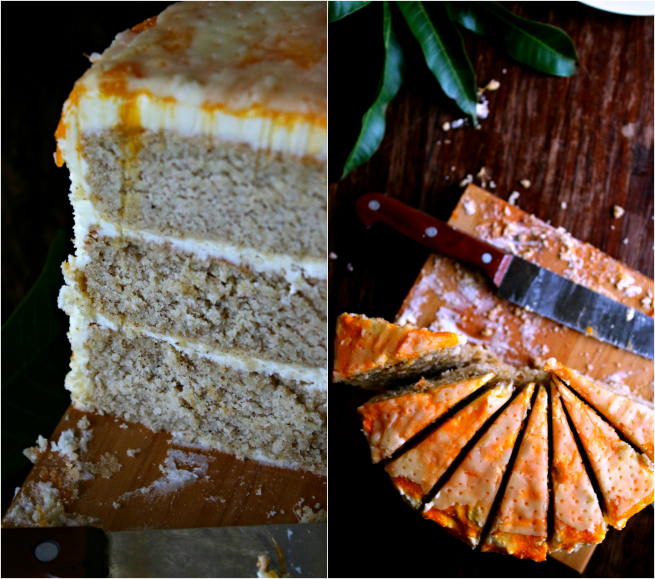
It is one thing baking and another baking in a charcoal oven. You have to use your instincts and try multiple times (with twice as much fails thrown in there too) to regulate the temperature and make sure the cake (a very sensitive desert) comes out in complete perfection…or something like it. I have had my fair share of fails (I think) and you can imagine how much I squealed in delight when this cake became perfection. It is a rich, moist and well spiced cake thanks to Paramount Dairies for providing me with this Thick Sour Cream. The sour cream adds a richness and moist interior while at the same time enhancing the flavor. And the exciting part is how easy this cake is to pull off. Once you master the basics of a pound cake, you will be able to whip up one (or three in this case) without any problem at all.
Observations:
- This cake requires three layers. The recipe below is for one layer. Just repeat the process if you want to bake more layers.
- To get a perfectly moist cake that rises evenly (so you don’t have to cut off the bulging part on top) I used Paramount Dairies Thick Sour Cream which you can find in major Supermarkets in Kampala.
- For a perfectly well risen cake (without the sinking middle or hardened parts, make sure the sugar-butter-egg mixture does not curdle (separate) thus whisking must be continuous and a little bit faster when adding the eggs.
- I omitted adding salt to my flour since the margarine (blue band) I am using is already generously salted. If you use non-salted butter or margarine, add a pinch of salt to your flour.
- I used two large eggs which, combined, were almost 100 grams. If you have smaller eggs, 3 will work.
- For a thicker layer of icing, double the recipe for the buttercream.
- Since the season for mangoes is still lingering around, I used mango syrup. If you do not fancy mangoes on top of your cake (which you should because they balance the sweetness of the cake and icing with a mild tanginess), you can substitute the fruit with one of your preference.

What you will need:
Cake
1C. Baking flour, sifted
100gm. Sugar
100gm. Butter/Margarine
2 Large eggs
½ C. Thick Sour Cream
¼ C. Milk
¼ C. Desiccated coconut
1 Tbsp. Ground Cinnamon
1 Tsp. Vanilla
½ Tsp. Baking powder
Icing/ Buttercream
500gm. Icing Sugar
250gm. Butter/ Margarine
1 Tsp. Sour Cream
½ Tsp Vanilla extract
Mango syrup
3 Ripe Mangoes
½ C. Milk
Method
Cake

In a mixing bowl, add the butter/margarine and sugar and cream till creamy and light. Add the vanilla extract and continue whisking. Crack one egg in the creamed butter and sugar and whisk. Avoid curdling. Keep whisking. Combine the baking flour with the baking powder and mix well. Add half of the flour and whisk. Add the cinnamon and keep whisking. Add the thick sour cream in the mixture and keep whisking. Add the remaining flour and mix. Add the milk and coconut and whisk well. Set aside. Grease a baking pan (preferably round) and coat it with a little flour. Pour in the cake batter and set aside for five minutes. Add ash in a larger pan ‘the oven’ about an inch and a half in thickness. This will even out the distribution of heat and prevent burning. Cover the oven with a metallic cover (or a second pan that fits well— Aluminium if possible) put the oven on fire— the charcoal stove and let it warm up for about five minutes. Insert the baking pan in the oven and cover well. Let the cake bake for 1 hour. Half way through baking, get half of the coals on the charcoal stove and put them on the covering/lid. This will bake the top part of the cake that has not been reached by the bottom heat and also create a browning effect. Once an hour is over, insert a paring knife, fork or toothpick in the cake. When it comes out completely clean without any cake batter, it is done and can be removed from fire. Keep the cake in an open space so it can cool down. Repeat the same process for the second and third layers.
Icing/Buttercream Frosting

In a clean large bowl, whisk the butter/margarine. Sift the icing sugar and add half of it in the creamed butter. Add the vanilla extract and sour cream and keep whisking (or beating with a wooden spoon if you don’t have a whisk-mine broke during this part). Add the rest of the sugar and whisk till the buttercream becomes light airy and soft peaks start to form. Keep refrigerated till it is time to use.
Mango syrup
Peel the mangoes and slice them thinly. In a blender, combine the mangoes and the milk and blend till thick and smooth. Chill.
Assembling the cake

Once all the three cake layers have cooled down, start assembling them on top of your desired platform. Put a layer of buttercream on the surface of the platform before placing the first layer so that it can keep them firm. Spread buttercream over the first layer and place the second then on the second layer and finally place the third. Cover the whole cake in buttercream and, using a the blunt and straight side of a knife (if you don’t have a spatula), smooth out the buttercream till it becomes even on all sides. Pour the mango syrup on top. Refrigerate the cake for about 30 minutes before serving.

Have a Slice.
🙂 Sophie
This post is made possible by Paramount Dairies. You can find Paramount Thick Sour Cream and other cream products in major supermarkets in Kampala.


