Sauteed Spicy Sukuma Wiki

sukuma-AKIU-7

Did you know that the literal translation of ‘sukuma wiki’ is to “push the week”? It surely lives up to its name because I last wrote about sukuma wiki close to two years ago. Back then we had planted a lot and always harvested close to 50 kg every week! This year when we did plant sukuma, the sun beat it so hard we thought it was never going to thrive. But sukuma wiki is a survivor. With over 3 months of sun  beating it up, it still looks so green and vibrant after just a week of rainfall. You can read more about it here and its health benefits here.

Sukuma wiki is always mostly served alongside posho. Any East African will agree with me. Cooking sukuma wiki is not as hard as it seems. In fact it is one of the easiest vegetables to cook. Today I am sharing with you one of the easiest  and common ways to cook this vegetable.

What you will need:

Two (or more) bunches of sukuma wiki

2 Large tomatoes, chopped

1 Large onion, thinly chopped

Ginger, grated

Salt

Chilli oil

Oil

sukuma


Observations:

  1. I  usually prefer the sukuma wiki to still have a crunchy raw feel. If you want it more tender, cook it a little longer.
  2. Tomatoes add a tangy sour taste to the sukuma wiki. To reduce the sourness, sprinkle in some sugar.

Method

  1. Thinly cut sukuma wiki and set aside.
  2. On high fire, place pan with oil and let it get hot.  Add ginger and onions and let them fry till almost golden. Add tomatoes, chilli oil  and salt and stir. Let the tomatoes cook till tender.
  3. Add sukuma wiki and fold in well. Let it cook for 5-7 minutes or until it turns a bright green color.
  4. Remove from fire. Garnish  with  thinly sliced onions and crushed nuts or simsim and serve with posho.


Let me know in the comments below how you prepare your sukuma wiki.

🙂

Sophie


Savoury Mozzarella Soya Bread


quesopan-AKIU-4

I have been on a baking high lately and every chance get, I keep buying yeast just so I can smell the wonderful and pleasant aroma of yeast wafting through the kitchen when the bread dough is rising. Do you ever feel that way?  Let us talk about this bread. It is made with ingredients that can be found easily. With a perfect combination of carrots, green pepper, spicy ginger, and mozzarella, this filling hearty bread is sure to frequent your baking routine. The best part: Mozzarella keeps the loaf moist and soft even after it has completely cooled off. Good news is you do not have to have an oven to bake. A charcoal stove can work and a pressure cooker too! This bread is probably one of the best I have ever made.  With Paramount Dairies Mozzarella cheese, you can make this savoury, tasty filling soya  bread because everything is better with cheese. Let me just stop talking so we can start baking.

quesopan-AKIU-5

What you will need:

4 C. Baking Flour, sifted

2 C. Soya flour, sifted

2 C. Carrot, grated

1 ½  C.  Mozzarella, grated

½ C. Green pepper, finely chopped

1/8 C. Ginger, grated

1/8 C. Parsley, finely chopped

1C. Milk, warm

½ C. Oil

2 Large eggs

4 Tbsp. + 2 Tbsp. Sugar

4 Tsp. Yeast

3 Tsp. Salt

½ Tsp. Black pepper

cheesebread11

Observations:

  1. Have an extra 1/2 cup of flour at hand for dusting your working area.
  2. The grated carrot and ginger have liquid in them. Less milk is needed for the flour but have an extra 1/2 cup of milk at hand.
  3. Soya flour softens the texture of the bread. You can substitute chickpea flour If you do not eat soya.


Method:

  1. In a bowl, add milk and 4 tablespoons of sugar and mix till the sugar has dissolved. Add the yeast and cover bowl for 10 minutes. In a separate bowl, whisk the egg and oil together and set aside.
  2. In another bowl, combine the carrot, green pepper, ginger, black pepper, salt, sugar, cheese, parsley, wheat flour and soya flour. Mix all ingredients.
  3. After 10 minutes, pour the oil-egg mixture into the milk-yeast mixture and stir well. Gradually pour the yeast mixture into the bowl with the rest of the ingredients. Knead till a firm non sticky dough if formed.
  4. Cover dough with a wet towel and let it rise for 1 hour.
  5. Grease/ oil your baking pans with margarine and set aside. After 1 hour, punch dough down and knead for 10 seconds. Divide dough into two equal parts and place each dough into the baking pans. Let the dough sit for another 15-20 minutes.
  6. Light a charcoal stove. Get two large aluminium pans (They have to be large enough for the cake/bread pan to fit in). Put ash in one pan (about 2-3 inches of ash). Put the pan with ash on the stove and cover than pan with the second pan. This is the ‘preheat’ moment.
  7. After the dough has risen for 20 minutes, gently place the baking dish in the pan (the one with the ash in it) on the stove. Cover with the second pan. Let the doughnut bake for 30 minutes (don’t open the pan at this stage). After 30 minutes have passed, get hot charcoal from the stove and place it on top of the covering pan making sure they are in the centre of the pan. Bake for another 30 minutes or unit the bread turns slightly golden brown.
  8. Serve warm. Makes two loaves.

quesopan-AKIU-8

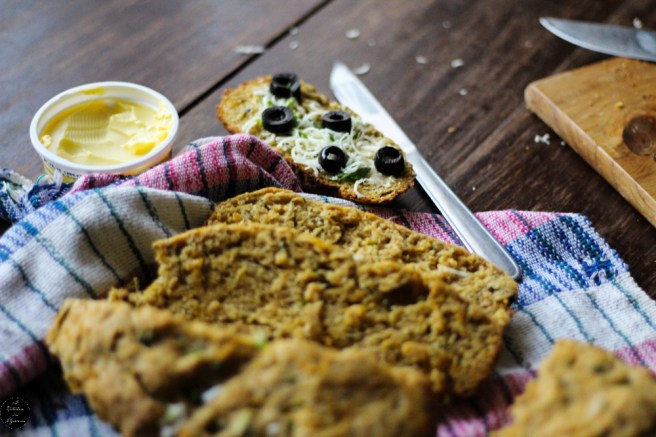
These loaves are great on their own because they have all the good stuff in them but you can serve them alongside your favourite beverage or soup.Use the #AkitcehnInUg to share your creations.

🙂

Sophie


This post is made possible by Paramount Dairies. You can find Paramount mozzarella and other cheese products in major supermarkets in Kampala.

Jack fruit Jam

fene jam 1_zpsveevsmd7

A lot of jack fruit has been happening eaten lately. I am sure to find out if it is the season or if we just got lucky. One great thing though is that we are more than excited that we can finally harvest from our backyard tree after more than five years of waiting. So I got to work because work is involved in eating jack fruit. From cutting to removing the individual pieces and then removing seeds while making sure you are not sucked in by the sap -> Pure joy! I started out with Jack fruit scones (which I will be sharing soon in a project I am working on). Since there was still a lot of jack fruit left, an idea to make jam hit too and here we are. This jam is so good. The perfect pungent sticky sweetness with a slight spicy kick from the ginger and your mornings will never be the same! Did I mention it is as easy to make as 123? Because sometimes we need hustle free cooking in our lives. Make this jam and you are good to go for more than a week.

What you will need:

1 C. Fully ripe jack fruit

½ C. Sugar

1 C. Water

½ Tsp. Ginger powder


Method:

  1. Finely dice the jack fruit and set aside.
  2. In a clean pan, combine diced jack fruit with sugar, water and ginger powder. Bring the mixture to a boil.
  3. Once it has boiled, reduce the fire to medium and let the mixture simmer till the jack fruit is almost translucent and the water has reduced to half.
  4. Remove from fire and let the jam cool. Store in a jar and keep refrigerated for three weeks.


Now all we need is bread. Also you can double (or triple) the recipe and give the jam out as gifts to friends!

Have a great week

🙂

Sophie