Beef Stock Congee.


How the congee happened: I first saw the recipe in a issuu magazine and fell in love.I mean surely congee couldn’t be hard to make now. I believe it to be a warm ‘comfort food’ rice soup and I totally heart comfort food. One thing about comfort food is that it is simple to make and the taste is still delectable. Good news is, it really is easy to make. It is just like counting from one to three… at least I think so. Hehe!
What you’ll need:

1 C Rice
3 C Beef stock
5 C Water
1 Tbsp Salt

Method
Ina fairly large pot, combine the rice, the stock and two cups of water. Let boil while stirring occasionally. When the water starts to dry out, add the remaining water(you may need to add more or less…depending on the consistency you desire) and let boil till it is thick and gooey but not completely dry.


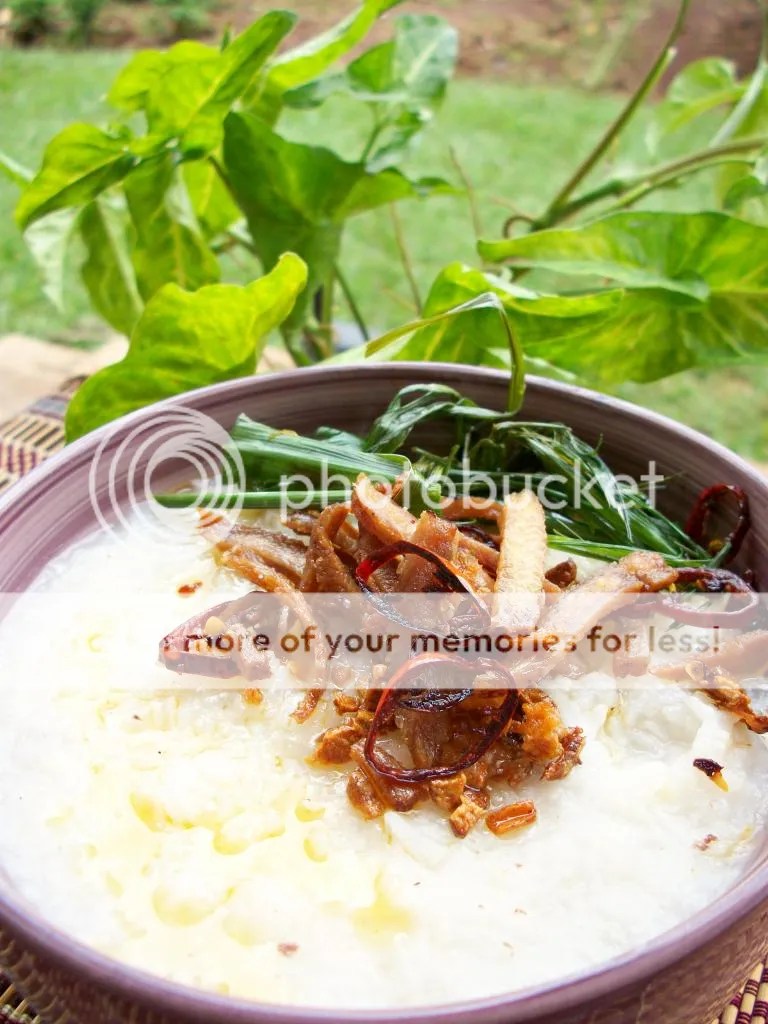
Serve in large bowls with garnish you desire.  Be creative (I (we) used three kinds of garnishes as you can see and the first one (above) had a savory intense and hot flavor while  the second and third (below) had mild crunchy feelings.)!!

Told you it was easy! Now go and make some congee
PS: I used stock from boiled beef
PPS: If you don’t fancy beef, you can substitute the stock with any other

Have a great week

🙂

Sophie


Roast Potatoes| How We Made It

I always have a feeling that every recipe created in this big big world of ours has a story behind it just like how we individuals have stories to tell. That’s what makes everything unique in its own way right?!

This is a story of how we (me and my little sister) nailed the roast potato in an oven toaster.

This summer I wanted to experiment more with cooking because after all, I wanna be a chef some day. I have been a long time reader of Manger the blog and this particular night, we sat a solid 3+ hours catching up on the blog and mentally swooning over the fabulous food!  Then an idea hit us and we wondered if it would ever be possible to roast potatoes in an oven toaster. The next day,we tried. Our neighbors had rosemary planted  in their backyard, so we asked for a stem, and used it as spice, cut the potatoes in half, sprinkled salt and oil in then and threw put them in the toaster. Fingers crossed, we watched and waited and soon the aroma started circulating the whole house. Boy was it heavenly!

When they were done, we tasted and couldn’t believe how perfect they turned out to be since it was our fist trial. They were so great we couldn’t stop grinning. The potatoes are a regular at home now and we can’t seen to get over. It’s amazing how in the rarest of moments, great things spring out of nowhere.

What recipe have you created that has a story behind it?

🙂

Sophie

PS: The oven toaster is our all purpose oven here hehe!

PPS: This blog made two years on July  the second, WOW!

Garlic Breadsticks

DSC09343j

Bread is so delicious. Especially homemade bread, preferably in a brick oven, in cold weather far away in the country side, served with tea perhaps… or a warm soup…Oh wait ,what am I getting at? Sorry I get carried away (a lot!) when it come to these things. You know the countryside, the warm soup in cold weather…I need to stop. The point is bread is good. And really who wouldn’t love bread in form of sticks? Ok so maybe I am the only one ha! This recipe was inspired by French and garlic bread and thus bread sticks.

  • 4 C All Purpose Baking flour
  • 1/2 C Butter or margarine
  • 1/2 Tbsp Baking Powder
  • 1/2 C Sugar
  • 4 Cloves Garlic (peeled and chopped)
  • 11/2 C Cold water or Milk
  • A Pinch of Salt

Directions

  • In a Large bowl, mix the flour, baking powder, salt and sugar.
  • Rub the butter/margarine in the flour mixture until it becomes coarse.
  • Add the garlic and continue mixing
  • Pour in the cold water/milk little by little while mixing until the mixture is a very firm dough.
  • Continue kneading the dough until it is smooth and isn’t sticking on your hands.
  • Wrap the dough in cling film and freeze for twenty minutes
  • Remove from freezer and using a rolling-pin, roll out the dough(you might want to divide the dough into two parts and roll it  in batches)until it is 1 inch thick.
  • Using a sharp knife, cut the dough into thin strips of about an inch in width.

Now in the next step, I used an oven toaster to bake the bread sticks. I haven’t tried an oven yet. So if you do let me know how it turns out.

  • Arrange the strips nicely in an oven toaster metal rack and bake for 12 minutes.
  • When the timer goes off, wait for five more minutes before removing them.Best served warm.

breadsticks

Sophie

PS: The ribbed effect is because of the oven toaster metal rack.

PSS: I think I am getting better at giving directions. Yes? No?