Banana Leaf Steamed Spice Buns

Steaming food has been a tradition I have  been exposed to all my life.  Steaming posho, dodo, and if we are feeling fancy, some matooke, has been a way of life. But my fascination with it grew in the past couple years when I was introduced to the world of steamed desserts and bread. You guys I have never looked back ever since. Then there is banana leaf steaming which, in my opinion, is a flavor in of itself and takes the food to a whole new level! You see there is something magical about the aroma of food enshrouded in banana leaves. Almost intoxicating. You want to add a complex flavor to posho, steam it in banana leaves. Want to have irresistible cassava that you can eat in one seating all by yourself (guilty!), steam that in banana leaves. You want to have sweet spiced bread for breakfast, steam it in banana leaves. You will be surprised and amazed at how the flavors are heightened.

The summer months are upon us and so are all sorts of berries. Last week I asked you on IG stories if you know the name of these berries and you all chipped in and googled the name till we agreed that they are black raspberries. I am amazed at your research skills and incredible teamwork! You are the best.

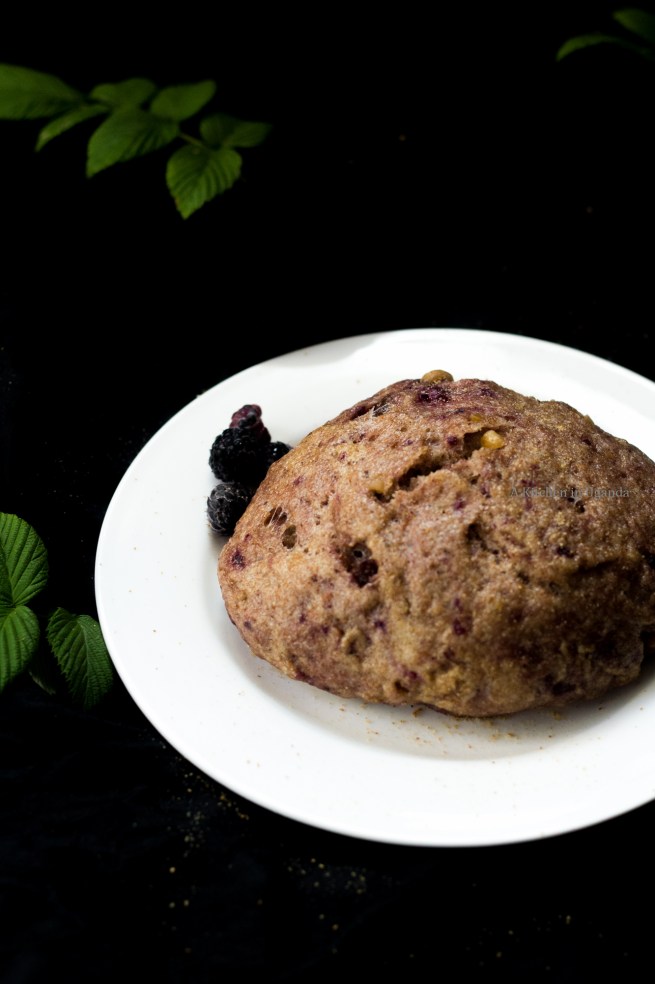
This bread is inspired by my love for the spice bun (a Jamaican sweet bread that is  an explosion of flavors and sweet spices) that I have been wanting to recreate for quite some time now. After eating it 101 times, I convinced myself that there are hints of cinnamon, ginger, cloves and other spices I cannot figure out quite yet. After I was able to pick more than two handfuls of these berries, I decided to try my hand at this addictive bread. What you see is my banana leaf steam version (with a twist of course) of the classic spice bun.  Now in this steamed bread I used these black raspberries, you can however use any type of berry that is readily available to you. I also added in nuts for texture. you can add anything that you think will add to the flavors and textures.

steam spice bun- A Kitchen in UgandaLQ-7

What you will need:

2 C. All purpose flour, sifted

2 C. Whole wheat flour, sifted

1 1/4 C. Milk

1/4 C. Oil

1/4 C. Peanuts/Groundnuts, crashed

1/4 C. Raisins

1/4 C. Black raspberries, lightly mashed

4 Tbsp. Sugar

2 Tbsp. Sugar

1 Tbsp. Yeast

1 Tbsp. Allspice (pimienta dulce), ground

1 Tbsp. Cinnamon, ground

1/2 Tsp. Nutmeg, ground

1/2 Tsp. Salt

1/2 Tsp. Vanilla extract

Method

  1. Dissolve 2 tablespoons of sugar in warm milk. Add the yeast and let it rest for about 10 minutes or until it has risen and foamed.
  2. Mix the rest of the ingredients except the oil and vanilla extract in a large bowl.
  3. Once the yeast has risen, add the oil and vanilla and mix well.
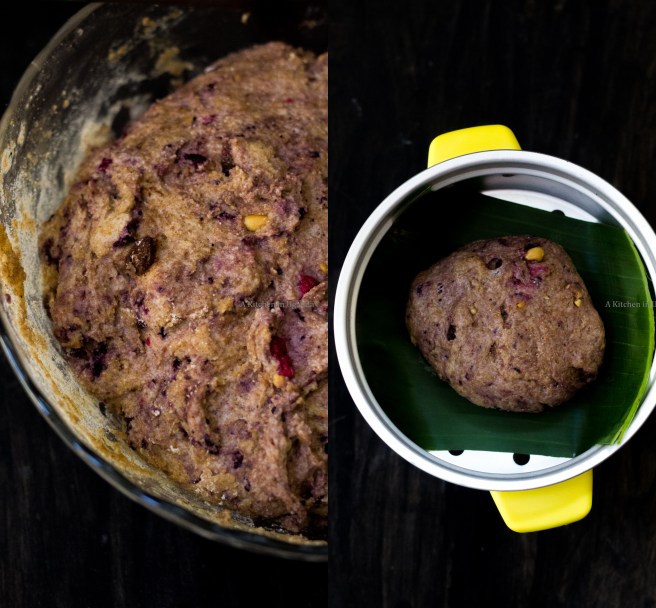
  4. Pour the yeast mix in the dry ingredients. Mix well till a dough forms.
  5. Let the dough rise for 1 hour.
  6. After an hour punch down the dough and knead it for about 5 minutes till it is smooth.
  7. Divide the dough into four equal parts. and shape them into buns.
  8. Place each bun on a clean piece of banana leaf and let them rise for an additional 30 minutes.
  9. While the bread is rising, place a pan with water for steaming on fire. I am using a rice cooker steamer. If you don’t have one, you can improvise.
  10. Once the bread dough has risen, gently place each bun on the steamer and steam it for 15-20 minutes. It will double in size.
  11. Remove from fire and serve while still hot and soft.

Have you tried your hand at steaming bread?

Mango Coconut Crepes

You would think that by now, the excitement over mangoes would have died down, but no. It hasn’t. At least not yet. So to continue our mango series, today I  am sharing with you these delectable mango crepes. It all happened after I binge-watched Tasty videos! Have you too fallen down the rabbit hole that is tasty videos? There was one video where they made  purple dragon fruit crepes and assembled a gorgeously bright crepe cake. Since I have some mangoes, I decided to substitute them for what would have been dragon fruit. The rest, as they say, is history. These crepes are made with fresh mango puree, soft and buttery and are served with a scoop of mango ice-cream and a spoonful of coconut cream. Summer dessert couldn’t get any better.

What you will need:

1 C. Flour, sifted

1 C. Mango puree

1 C. Milk

1 Tbsp. Sugar

2 Eggs

2 Tbsp. Margarine, melted

1/2 Tsp. Nutmeg

1/2 Tsp. Vanilla

Oil for frying


Observations:

I used coconut milk in the crepes. You can use any milk that is readily available to you. Make sure the mangoes you are pureeing are fully ripe.

Method

  1. Combine all ingredients in a blender and blend till smooth. Pour blended crepe batter in a bowl and set aside.
  2. Place nonstick pan on medium-low heat. Brush pan with oil and let the oil heat.
  3. Use a 1/3 cup to scoop up the batter and pour it in the pan.
  4. Let the crepe fry till the edges turn golden brown.
  5. Flip the crepe using a spatula and let the other side cook as well. It will take about 1 minute.
  6. Remove from fire.
  7. Repeat process till all batter is used up.
  8. Refrigerate the crepes till completely cool. Makes 8-9 crepes.
  9. To assemble, fold crepes and place on plate. dust with powdered sugar. Add a scoop of mango ice-cream. Sprinkle with coconut cream. Finish off with raisins.

Serve immediately.


PS: This recipe is adapted from Martha Stewart’s Simple Crepes recipe.

BLOGGING 101: How to Create Consistent Content

This is Part 2 of the blogging series that I am writing for you. If you would love to know the basics of blogging, then you are in the right place. If you would love to know step by step how to open up a WordPress account, read part one of the series.

Today we will talk about how to create content and keep it consistent. You have set up your blog and now you are wondering how you should go about being consistent. Consistency is key in developing and growing a blog and I can testify. The rule is that if you are going to post twice a day, then post twice a day…continuously. If it’s going to be once a week then let it be once a week and stick to that. Writing, like everything else, requires practice. If you have already compiled articles/ stories to publish, then your work is reduced by half. If you haven’t any articles written down, there is no need to worry because it is what I will be talking about.

Having a notebook is very important. It helps a great deal to have a place where you can easily jot down everything about your blog. It could be passwords to a plethora of tools and services you have signed up for ( Guilty here!), ideas for future blog posts, and anything else that you think will come in handy later. A notebook helps you have a tangible place for your blog related stuff and it helps you stay organized. Again any notebook will work great. I have a larger notebook that stays home and a pocket-sized one that I keep with me for those days when ideas strike and need to be written down before they disappear.

One you have selected a notebook, jot down ideas. ALL. OF. THEM! The great thing about creativity is that inspiration comes from anywhere and everywhere. It could happen when you are taking a walk, when you are taking a shower, shopping, traveling and sleeping. Yes even sleeping! Make sure your ideas are in line with your over all theme and purpose. Once you have written down your ideas, start drafting blog post topics and outlines. What you do is decide what days in either a week or month you want to post and then assign each of those days a topic. One effective method I love is using sticky notes to write down potential blog topics and a few general ideas I have about them that I may forget. It looks a little something like this:

This is honestly a game changer and helps reduce the time it would normally take to brainstorm ideas, write blog posts and schedule them. This method is very important for me because it helps me have a glance of the whole month and  stay aware of what I need to be working on so that I stay within my deadlines. You can do this by setting aside another notebook where you paste multicolored sticky notes (or paper) to write down topics of your blog posts. You can generate ideas and plan up to six months of content and then  just work towards drafting and polishing the posts.

Now that you have planned out your months, it is time to draft posts. Having a working schedule will make publishing easier, reduce burnout and, maintain originality. When I started out I was over ambitious and thought posting twice a week would work but after a short while, I had to change my schedule to posting once a week. This allows me to thoroughly experiment with my creations before I posted them and has made it possible for me to publish quality without having burnout. Keep in mind that everything takes practice. Drafting your blog posts days before they are scheduled to be published gives you time to polish them well so you can have well-rounded articles.  The great thing with WordPress is that you can write your drafts and you can keep updating them as much as you want until you feel you are ready to  hit the publish button. For proofreading, grammar, and spellcheck,  I recommend using the world’s best automated proofreader, Grammarly.

Once  you have written your posts and are content that they are ready to be published, you can now schedule them. Your posts will be automatically posted on each scheduled day respectively without you doing a single thing. This allows you to plan for the future and allocate your time to doing other things while the blog is being updated consistently.

And finally,

A great way to make friends in the blogging world aside from social media is by leaving comments on other people’s blogs and liking their posts. Interact with other blogs you admire and your readers. Discover other blogs and bloggers. Comment, like, share views, guest blog, email and encourage each other.  It not only helps the owners of other blogs check out yours but also other commenters will be able to visit your blog. It’s a big world out there and it can be fun.

I hope this part was useful to you.

I will be sharing the final part of this 3 Part Series in the coming weeks. It will be a compilation of all the tools that I have used to blog. From image editors to social media scheduling sites. If you are wondering what tool I am using to create these graphics, just stay tuned for Part 3.

If you have any other questions about blogging in general, let me know in the comments below.


NOTE: This post  includes affiliate links. I am only sharing products  and services that I believe in and know will add value to your blogging experience or business. If you decide to purchase a product or service, I may  earn a commission for my recommendations. Thank you for your support!